
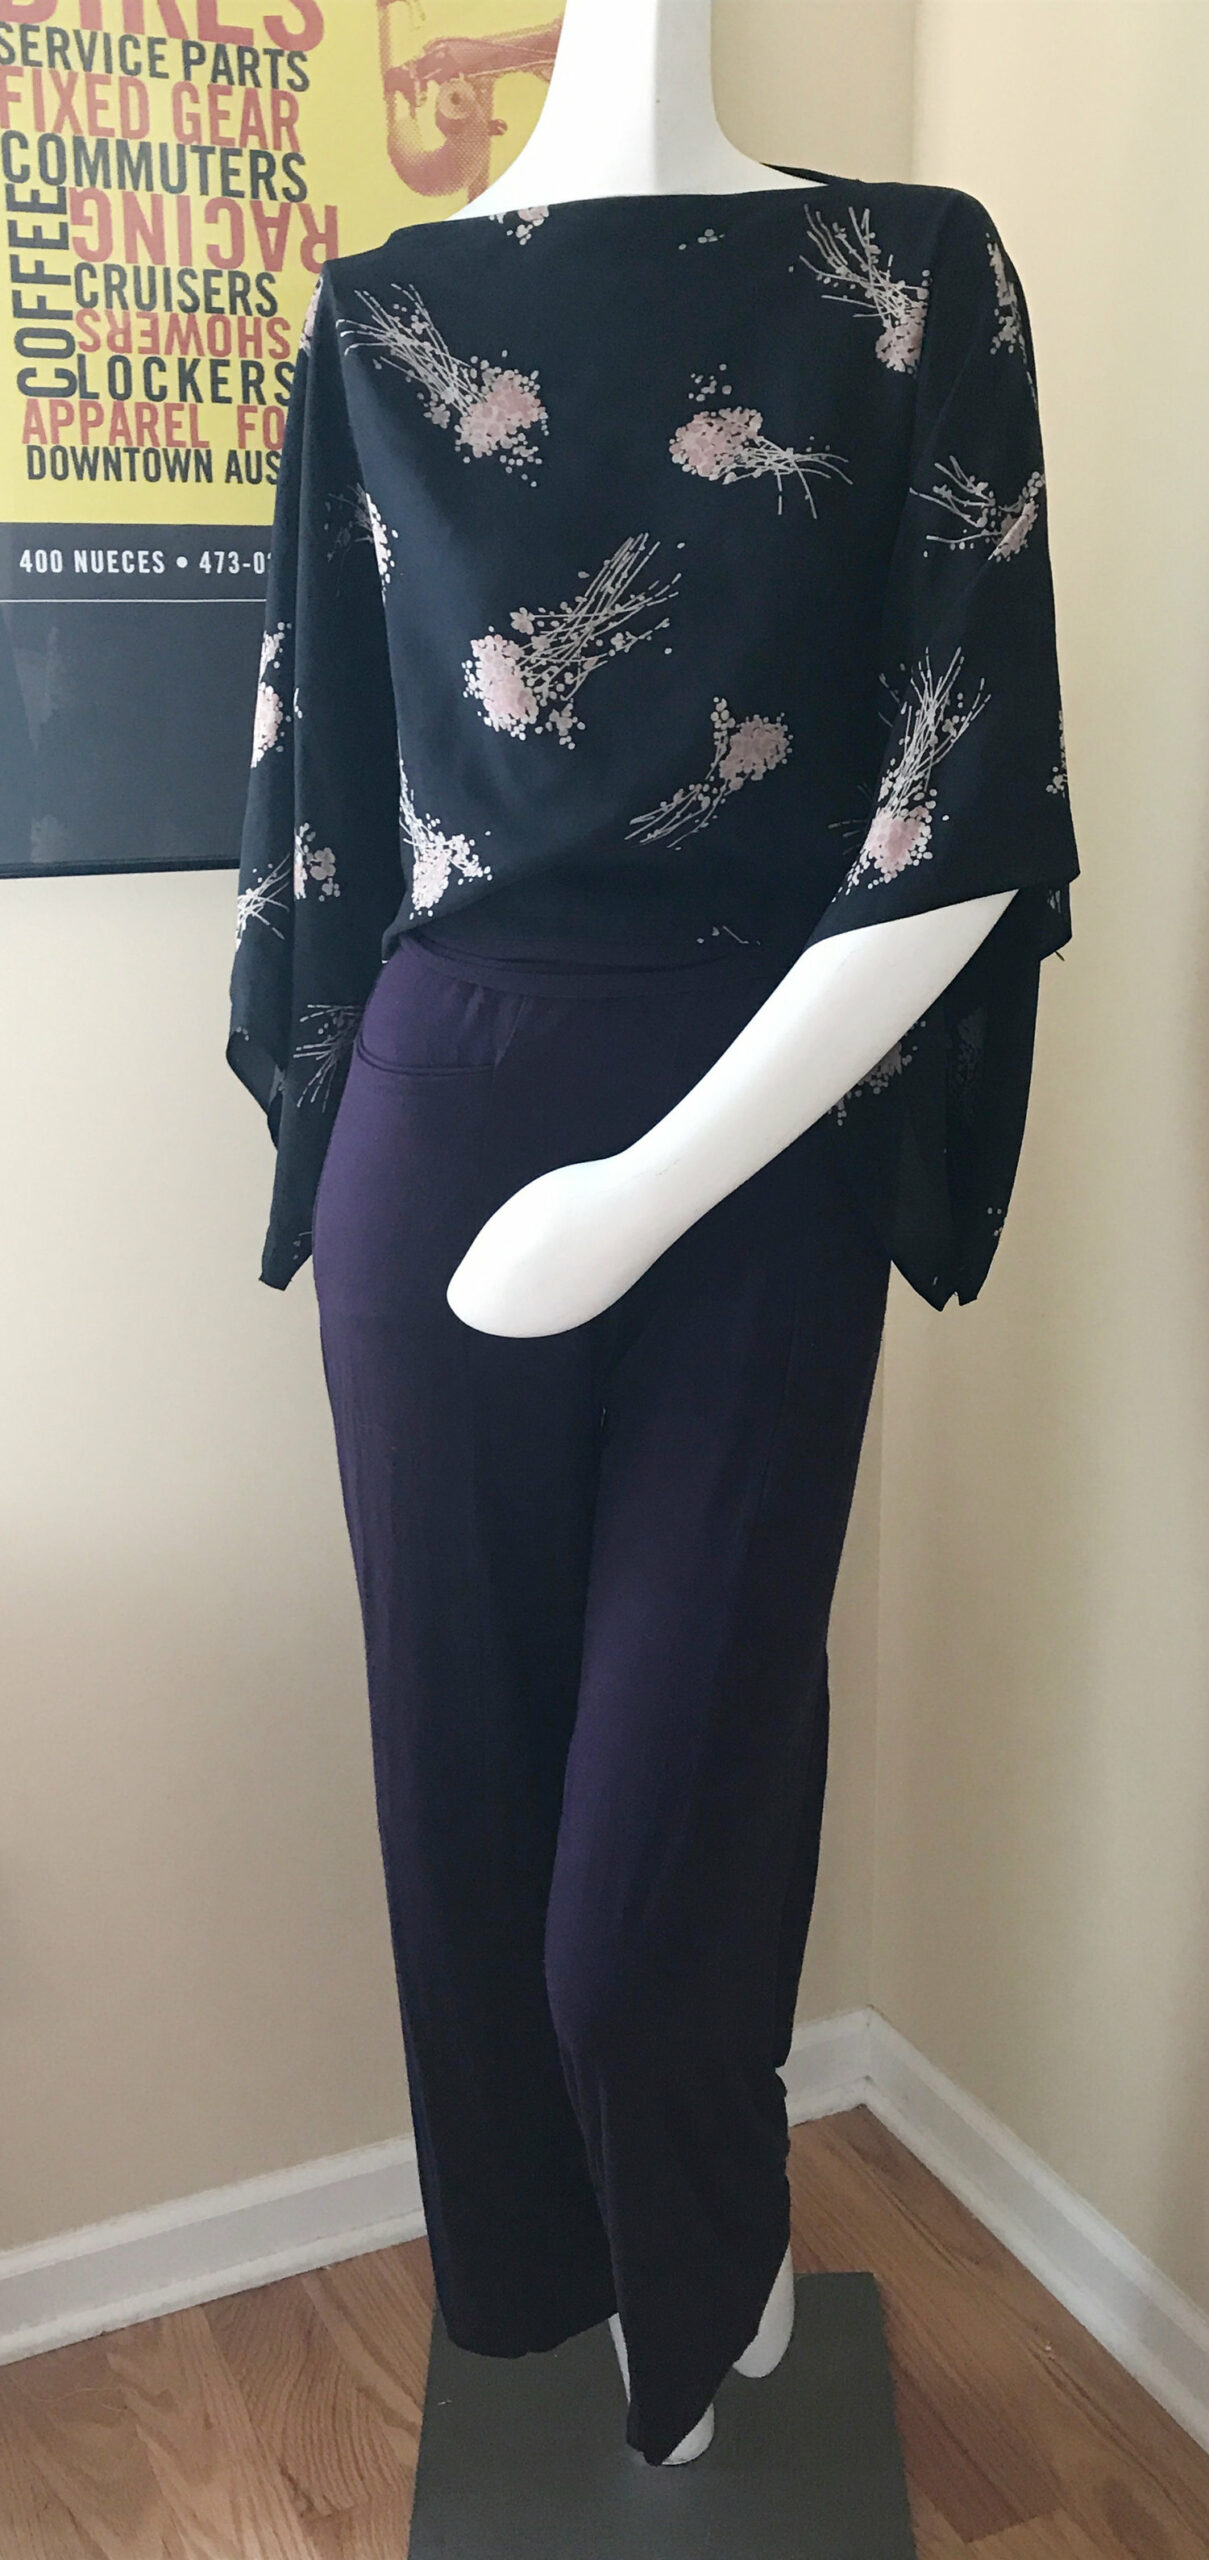
This tee is a rectanglar top that can be worn as a bateau neck tee or a poncho (depending on how you finish the top). The Greenbush Top is a quick no-pattern one-yard poncho kimono rectangular top sewing pattern is designed by Ann Siegle. A version of this blog post, authored by Ann Siegle appears here on the Christine Jonson Patterns blog.

#greenbushtop
This graceful square kimono-style sleeve top uses a selvedge-to-selvedge piece of soft woven fabric like rayon, silk, silky poly, georgette, cotton voile or knit fabrics like rayon jersey, silk jersey or bamboo jersey. It’s super easy to make and it’s easy for beginners. It goes really well with high waist pants and skirts. Slim fitting tops like cami, tees and turtlenecks can be worn under it for more warmth. A 45″ to 50″ width fabric is ideal for this top – wider than that, you may have to hem your sleeves when you’re done, to whatever length you like.
To sew this, you’ll need to take a few measurements first!
1) Hip circumference – this is the widest part of your hip/bum
2) Desired top length – the version shown in the example is high hip, at the hip bones, but you can go as low as mid-hip if you want more of a shirt length if you’re not wearing high-waisted pants or skirts. Add 1.5″ to this measurement.
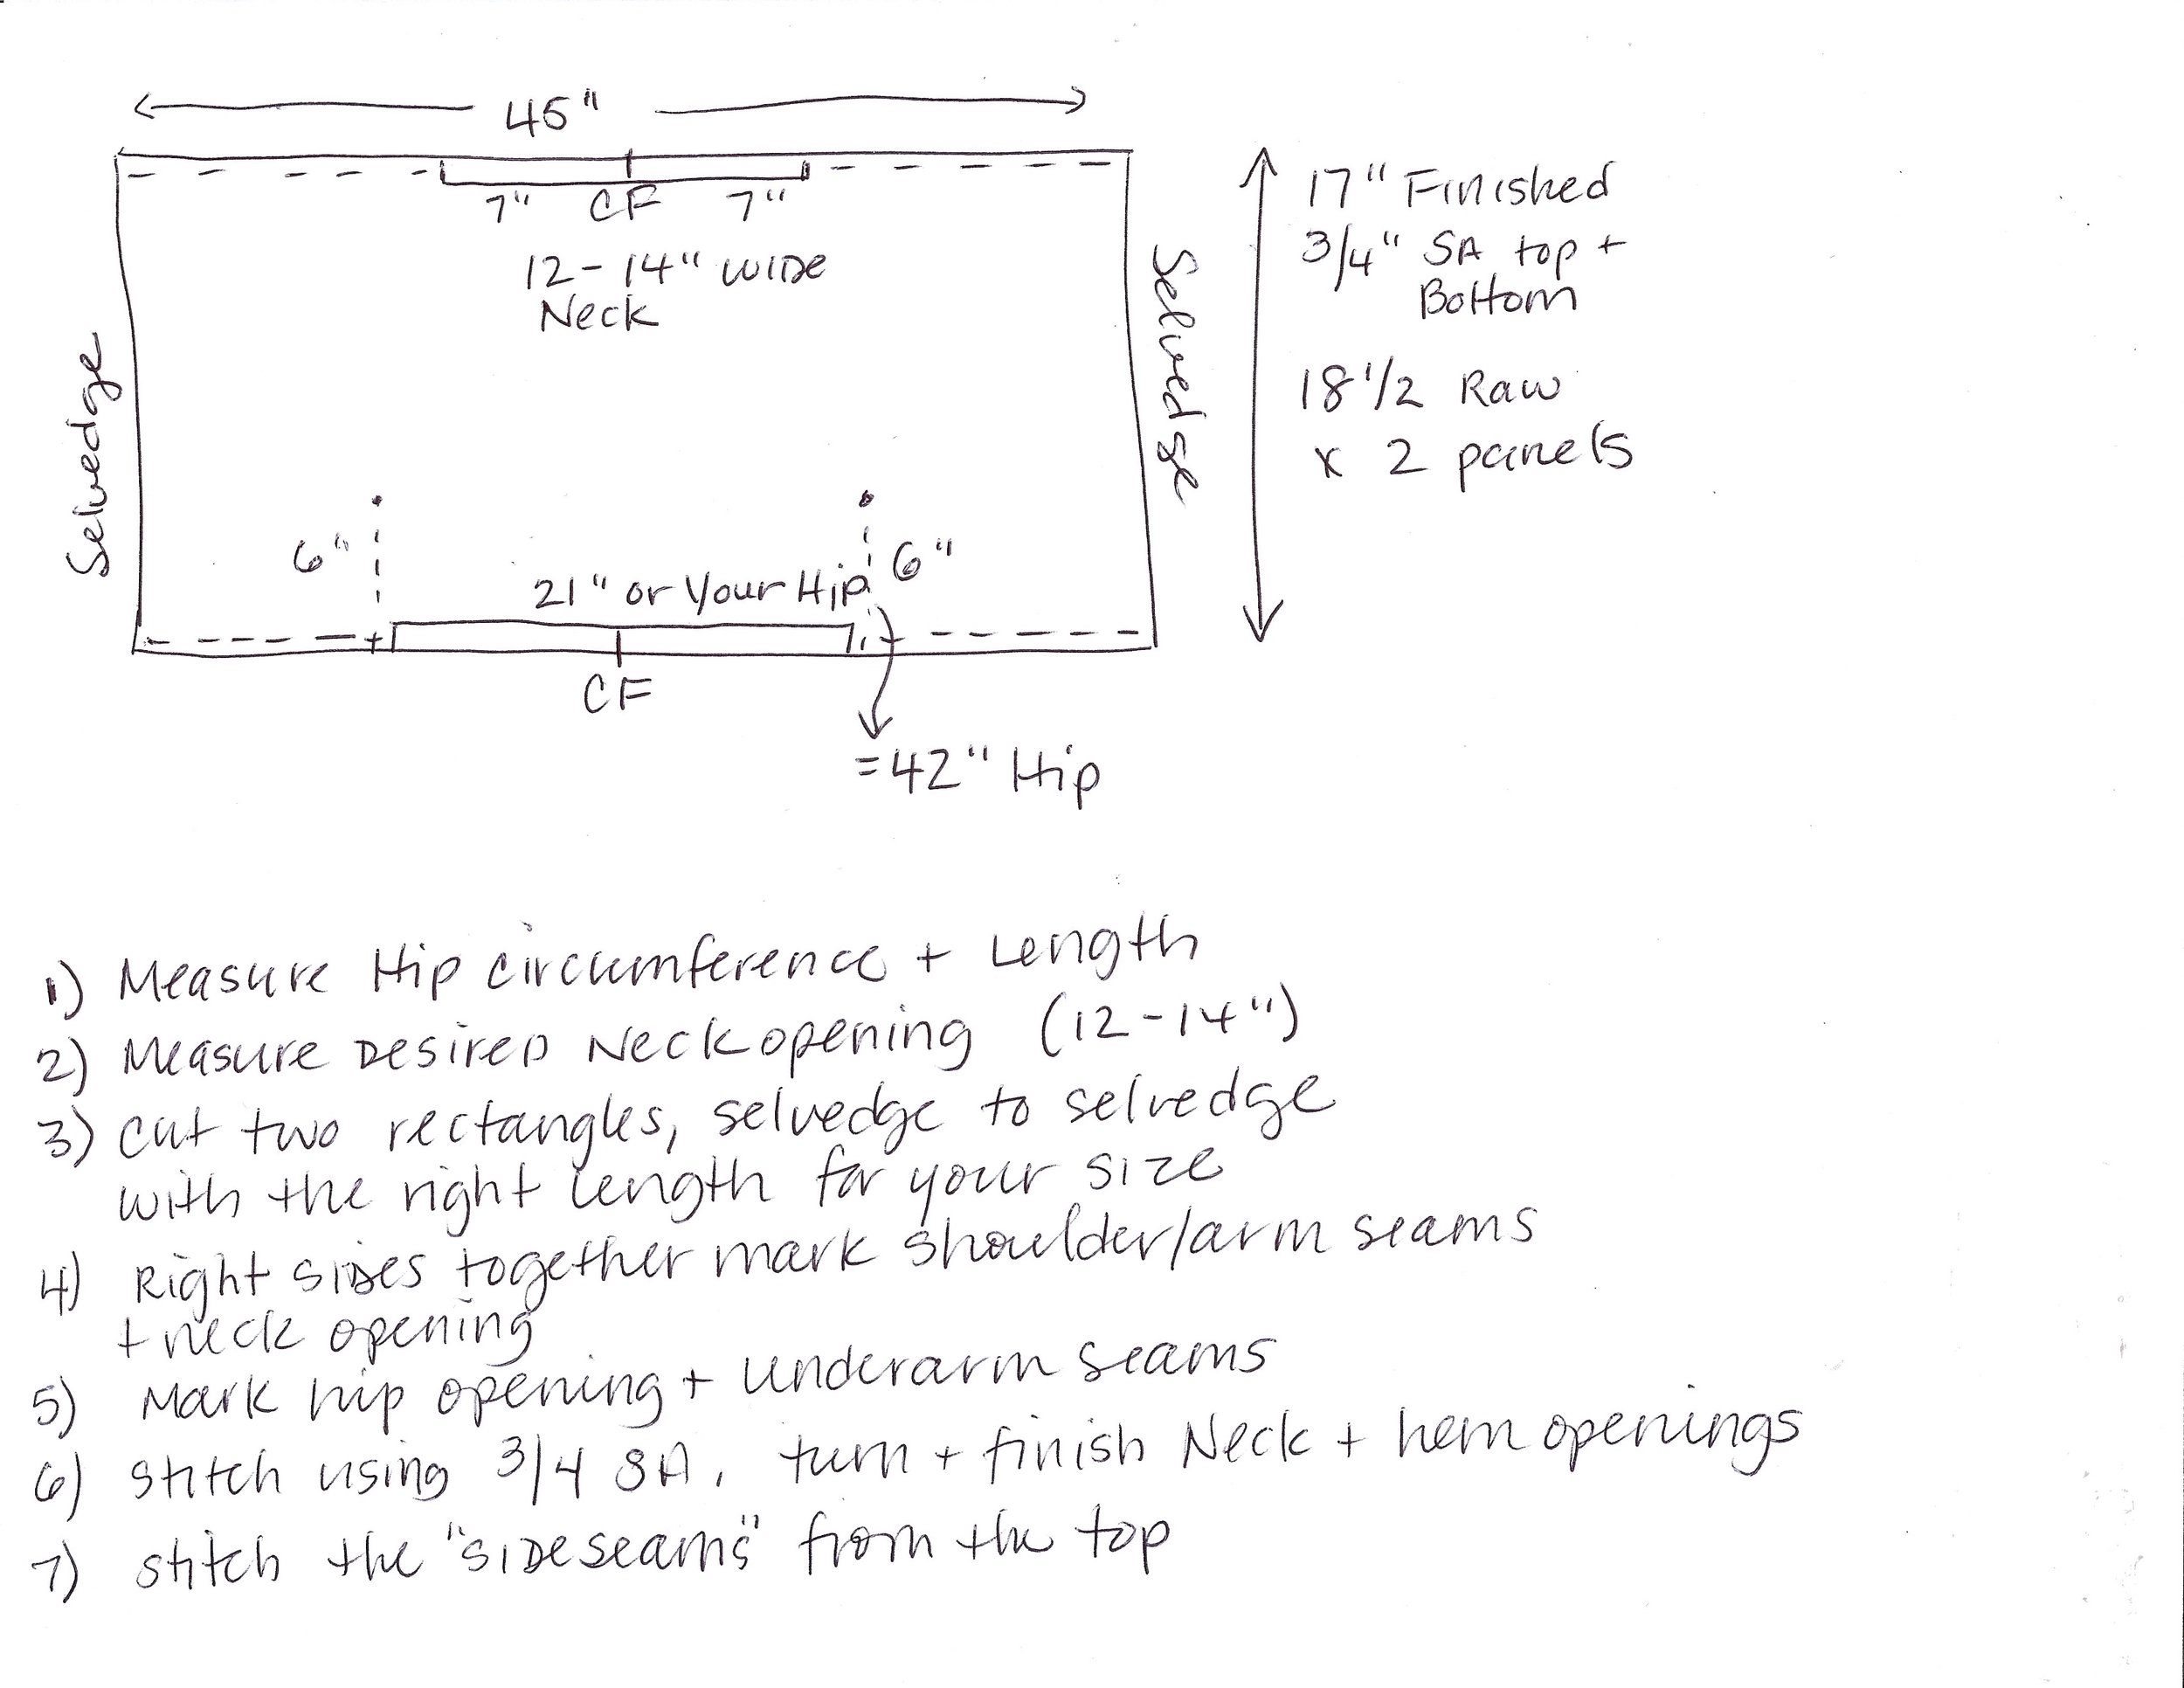
3) Desired neckline opening (from 12” to 14” – the example is 12”.
Once you have your measurements, you’ll want to add 2” to 4” to the hip measurement (hip plus ease) and divide by two (so if your hips measure 40” you’ll add 2” to 4” – 42-44” and divide by 2, or 21-22” to get the measurement for the hip opening at the bottom. If you’re unsure, go with the larger of the two ease measurements (4”) as you can always take away the width at the hem opening, but you cannot add it back!
Cut your fabric length (see above) from selvedge to selvedge with 3/4” seam allowances both top and bottom. The selvedge is the finished edge that the fabric comes with from the manufacturer. It will not ravel. If your desired top length is 17” hemmed and finished (example, high hip on Ann), you’ll cut 18.5” high x two panels x the entire width of the fabric, or just ever so slightly OVER one yard of fabric! So each panel is 18.5” high x the width of the fabric in our example here.
Mark the center front of your fabric panels. Divide your neck width x 2 and mark that on either side of the CF, so if you’re using 12” wide, mark 6” on either side of center front (CF).
Do the same for the hem opening, marking on either side of the CF, or 10.5” or 11” on either side of the CF mark for the hem, depending on your hip + ease measurement. Yours will be different.
If you want to finish the long edges of your top now, edge serge these so they don’t ravel. You can also finish them in the next step with a double flat felled seam.
Placing fabric right sides together, using a ¾” Seam Allowance (SA), seam from the sleeve hem edges to your first mark on the top edge, creating the shoulder and over arm seam. Backstitch for security at the neck opening.
Skip over the neck opening and backstitch at your next neckline edge marking and stitch to the sleeve hem. Press this seam open. Fold the SA under on each side of the top seams and press. Topstitch. This creates a finished flat-felled looking seam on the shoulders AND finishes the neckline at the same time! If you serged, you can simply press the seam and neckline open and topstitch on each side of the seam or neck opening, no need to turn it under.
If you’re making a poncho, hem all the way around your top now, you’re done!
If you’re making a top, continue on:
Repeat the same step for the bottom hem as you used on your neckline, using your hem opening markings. Your top will have one wide opening for the hips and one narrower opening for your head.
Turn the top right side out and press the rectangle flat.
Mark 6” up from your hem where the hem openings begin and stitch, a vertical seam, backstitching at the top of the 6” marking for security. This creates your “sideseam”.
Hem your sleeves to your desired length.
Slip the top on and enjoy!
If you’re wearing these with high waisted pants (my recommendations listed below), your top will come down over the top of the pants, no need to wear anything under your top. But if you feel more comfortable, a cami can be worn under it.
Click on this image to enlarge it.
Favorite high-waist pants sewing patterns that go well with the free kimono poncho top
For knit fabrics:
Christine Jonson Perfect Pant (skinny, flare or wide leg versions)
Christine Jonson Cuff Pant
Tummy Tamer Trousers by HotPatterns
Miracle Pants by HotPatterns (for stretch wovens as well as knit)
For woven fabrics:
Pietra Pants by Closet Core
Emerson Trousers *high waist view by True/Bias
Rose Pants by Made by Rae
You can also wear these with jogger pants, jeans and skirts too! Just adjust the length of the top before you cut to be sure you have the right waist coverage you prefer.
That’s it! A stylish, easy to sew, beginner-friendly rectangle kimono poncho top.
Variations: Make it into a rectangular poncho
If you omit the seams under the arms and at the side seams, you can wear this as a rectangular poncho over any other top. The arm / sleeve seam and the sideseam makes it a top instead of a poncho.